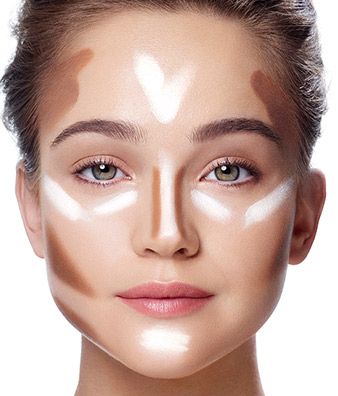
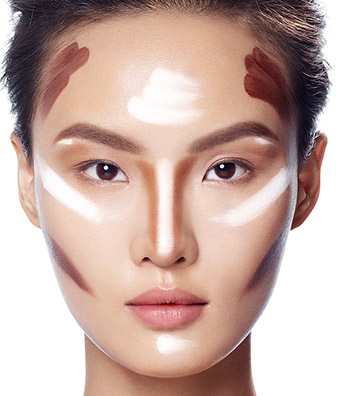
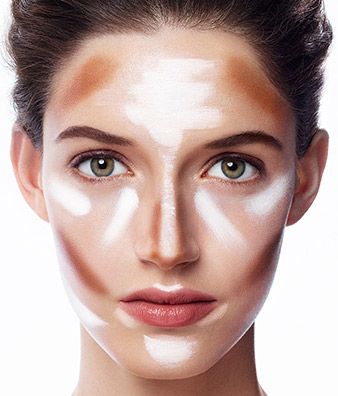
Contouring is the usage of matte powder, pencil or cream, which are two shades darker to your regular skin tone. These are used to redefine your facial features, which includes your nose, foreheads, cheekbones and chin. On the other hand, highlighting contour is accentuating facial features with a light concealer. To create a perfect highlight, you have to use a concealer which is two times lighter to your skin tone. It could be like a highlighter which flatters the complexion and emphasizes the facial features to come out naturally!
Contouring is important to be followed according to face shape. We have posted a handy guide so that you can do it right! The first step is to be sure of what face shape you have. We tend to confuse between oval to oblong or round to heart, which is why knowing the right features is important too.
Diamond shape
Features
- Hairline narrower than cheeks.
- Chin slightly pointed.
- The face is more on the long side than on the wider.
Where to contour
- You have to contour on the area just below the cheekbones.
- This starts from the ears and ending in the middle of the cheeks.
Where to highlight
- Highlight under the eye, that too in an inverted triangle shape.
- Continue to the brow bone for brightening the eyes.
- Just in the middle of your forehead and middle of the chin, broaden these to make them look naturally narrow.
Heart shape
Features
- If you have a heart-shaped face, your cheeks would be wider than hairline.
- Your chin will be narrower and slightly pointed.
- A perfect heart shape facial feature will have a widow’s peak.
Where to contour
- You have to contour along from the forehead along the temples so that there is a proper balance between the wide upper half of the face with narrower and lower half.
- The area which is below the cheekbones which start from the ears and end just in the middle of the cheeks also has to be centered.
- There is a small portion just below the chin which softens this area.
Where to highlight
- Highlight the region under your eye, and follows an inverted triangular shape. This process brightens the eyes, and makes you glow more.
- Also highlight the middle of your forehead and slightly in the middle of your chin. This will broaden your face naturally and make the features look narrow.
Oval face
Features
- Oval faces are 1.5 times longer compared to as wide it is.
- There are no major points along the jaw-line, hairline or chin.
- Your face can be easily compared to looking like an upside-down egg.
Where to contour
- The sides of your forehead should be well contoured. This swiftly makes your hairline look a little narrow.
- The area below the cheekbones which starts from the ears and ends at the middle of your cheeks is one more place to contour.
Where to highlight
- Highlight the area just in the middle of your forehead and at the middle of your chin. The places will be parallel and easy to detect.
- You must also highlight the area under the eyes and along the brow-bone. This brightens up the eye zone.
Round face

Features
- Round faces are easy to detect as they are simply circular.
- Round faces are equally wide and long.
- There are no sharp points at the jaw-line, hairline or chin.
Where to contour
- Contour on the sides of the forehead and then along the temples. This will make your face look wider and slightly narrow too.
- The area just below the cheekbones, starting from the ears in the middle of the cheeks is also a place where you should contour. This makes the jaw look less curvy and more lengthy.
Where to highlight
- You should highlight on the middle of your forehead and repeat in the middle of the chin.
- Mark out an inverted triangle, just below the eyes and have them brightened too!