Rangoli patterns have been beautifying our houses for ages. They are traditionally followed for special events and they brighten up our joy and celebrations. Freehand rangoli patterns are the ones we do without the help of rangoli instruments.
If you decide to do freehand rangolis it is best to start off with the dotted ones, since they are easier to start with and neater to look at. Dotted rangolis will assure you of neatness and beauty, but they will look a little mechanical compared to the rest.
Dotted rangolis are made over a dotted base which helps your draw the patterns by joining one dot to another. In this article, we will go through some of the best dotted rangoli patterns which can be done without external rangoli instruments.
Square rangoli on a rhombus base

Take out your square zone and then make a rhombus shaped dotted base. Start from the center where you mark the first rhombus and then continue according to the shapes you see.
The second layer included an extended square-like pattern and then comes in another rhombus-like area which has different patterns for the corners. It then has another base in maroon which are also enhanced with different shapes in blue and purple. You will have endless opportunities to make your own shapes but you just need to align them properly.
Rhombus base with floral background

This can be made into a big rangoli pattern, as it extends after the rhombus base. Chalk out the dotted area and then let the lines curls through the dots. You will not see the regular alignment since there are curves makes the rhombus take its shape.
After the rhombus come to life, it has been extended with floral patterns in two layers. These patterns extend the design and make it look bigger. Add colorful shades like red, green, blue and orange to brighten up the rangoli pattern.
Big rangoli with hexagonal shapes

This rangoli is similar to the one we saw above. The difference is most due to the shape of the rhombus being replaced by the hexagons. In the core of the design, we see a six-petaled flower in white.
The orange lets you chalk out the curvy hexagonal shape, after which you can make smaller hexagonal shapes all around the zone. There should be five small shapes which lets you make another one above the third hexagon. This will make the floral pattern easier to curve. Add the colors to the shapes and finally draw six-petaled flower for each division.
Hexagon base design with stars and flowers

This design is wholly based on the hexagon. You have to make a big hexagonal base design and then continue with the stages. The core of the shape will have a circular portion which is followed by two stars, one above another.
The stars will have rhombuses drawn with every corner, while you also spare one rhombus design between two starred corners! This will give you ample space for the floral patterns on six sides of the hexagons. The rest of the area can be covered with curved lines to complete the design. Place the correct colors so that the alignment is maintained.
Hexagonal base with flowers
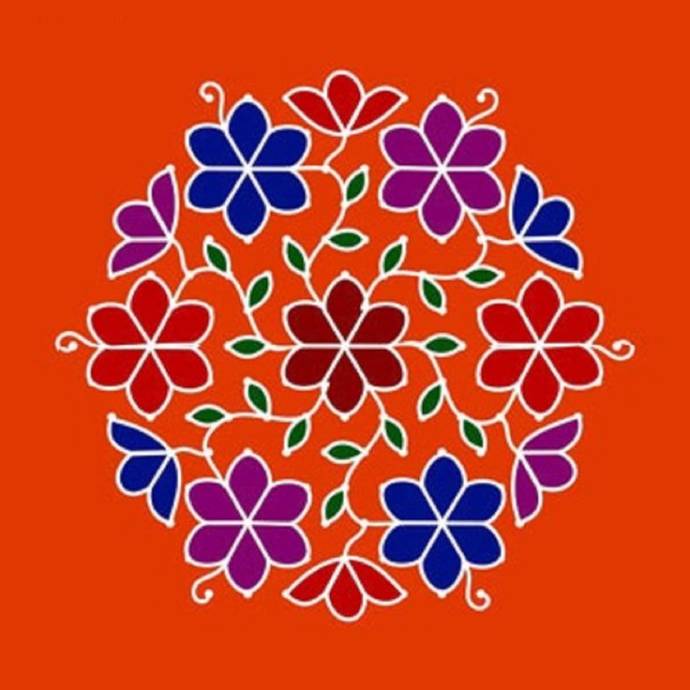
This is another hexagonal dotted base but is comparatively easier and smaller. Start off with the hexagonal base and then draw the first floral pattern. This pattern which lead to the leaves, from every joining.
These leaves are then led to other floral patterns which beautify the rangoli a little more. For the outer part of the hexagonal shape, we also get to see floral patterns on every side of it. Fill it with bright colors like purple, red and blue, while the leaves would have shades of green.
Easy diwali rangoli
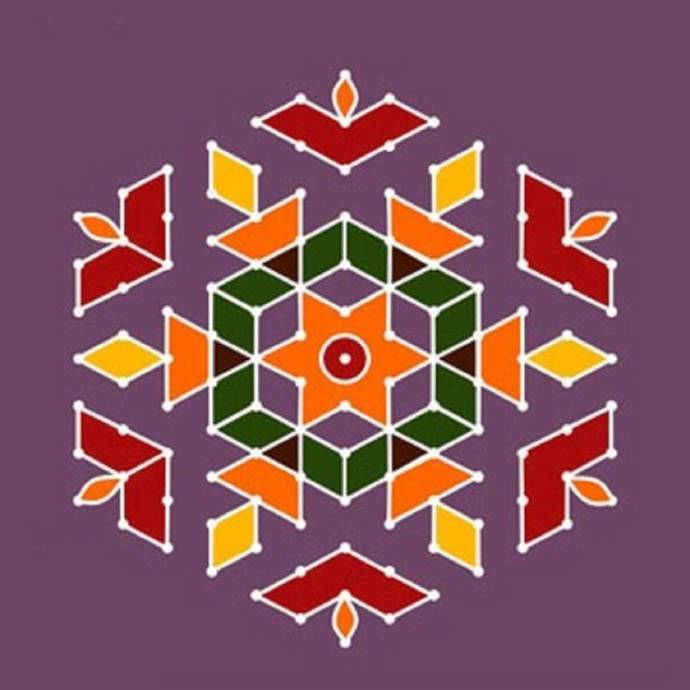
This is an easy diwali rangoli pattern which has been done over a hexagonal base. It has diya all over it and that is what enhances the look. In the middle we see a circular portion which has a star surrounding it. This portion has been further surrounded by a hexagonal design.
Though they have been chalked out in rhombus shapes for filling in colors, the entire looks takes up like the one of a hexagon. These then have diyas surrounded all over with proper flames in droplet like shapes. We see another coat of diyas which completes the hexagonal pattern.
Unique hexagonal base rangoli pattern

This is not an ordinary rangoli pattern, since the colors have been placed uniquely. There is base of a bubble-wrap which is big in size and have all been plucked.
These bubble-wraps form a concave shape which makes it easy for you to fill in colors, while they also turn out to be your ready-made dots! Start off with the first layer which has 6 pink colors forming a flower-like shape. Choose your own shapes and color the portions accordingly. You have to maintain the alignment and the rest of it will go smooth.
Pongal rangoli with dots

This rangoli will need a little more enhancement, as long as you’re not ready to let go of the patterns in shades of blue and pink. The rest of the design are based on dotted area and take up floral or star-like patterns, as you perceive it.
There are hexagonal patterns at the core which make the two intertwined triangles possible for you to draw. Color the shapes alternatively so that the distinctions of the shapes are visible.
Lotus and butterfly dot rangoli

Give a bright color base and then chalk out rhombus shape for your rangoli. Make a rhombus in the middle and then enhance it like the floral pattern around it. The corners of these pattern leads to the floral patterns which look like an opened lotus.
They have leaves below them and are colored in red and blue. Make three droplet-like patterns, one horizontally and two vertically and then make the filler to completely the butterfly shapes. End it with designs at the side which are like regular curved kolam patterns.
Color rangoli with dots

This pattern takes the dotted rangoli to a whole new level! This is not like the regular ones which you mark with dots but it has colorful dots itself. Chalk out the yellow background with dots and then add the red to surround them.
This gives you the circumference and then you get ample space to fill in dots on the inside. Use bright colors like blue, yellow, green, pink and orange and brighten up the look. Enhance the outer part as you like and as easy as you want to do it.
Swirl shape with floral patterns

This is an easy dotted rangoli pattern which looks like a swirl. This has been created hexagonal shape and looks really colorful.
The dots have been added to create the swirl shape, which has been followed on the hexagonal dots. The tips have floral patterns added and they have colored with colorful shades of yellow, orange, red, blue and green. This is a small rangoli which you can follow for initial learning.
Dotted rhombus with diyas

This is one of the best rangoli designs if you want a diwali pattern and it has to be easy and neat. This dotted rangoli has been chalked out on a rhombus base and has been connected by creating intertwined lines from one dot to another. There are diya shapes in-between the shapes of the dotted pattern and the end result look really beautiful and attractive!
Easy pongal rangoli
This is another dotted rangoli idea which can be tried with the link of your dotted base. Create a rhombus base and then make the shapes by adding one dot to another.
The patterns will represent the vessel you see on four sides, accompanied by the palm trees. This is a perfect idea for pongal festival when you need such patterns to be drawn with ease.
Big dotted rangoli with floral patterns in red and white

This is a really beautiful rangoli which will need quite a big space to have it perfectly followed. There are rings made one after another and then have internal designs with petals.
All the designs have been carefully done by following a dotted background. You are advised to start it off on a smaller scale and then gradually make the size bigger. You also have to be careful about coloring it intricately.


